Script Converter
Conversion will take a while in Windows. It will initialize a new directory, copy a slimmed down Python install into it, and then convert the script into a form which utilizes Selenium Wrapper. Once finished, it will prompt with a notification. Progress can be monitored in the black terminal that opened when the exe/script was initially ran.
Assertions or known useless code will be automatically stripped from the script provided. Assertions are not currently supported as the wrapper does not currently wrap itself in a unit testing suite. Most functions used in the script will be replaced with in house functions, such as driver.find_element_by(...).send_keys( "text" ) which is wrapped into a sw.utils.sendKeys() function. This eliminates the need for extraneous function calls and, in this case, is much faster as typing is instant. Conversion also replaces any find_element_by_ segments with sw.utils.sleepwait() which is a controlled (and CPU-optimized) function to wait for an element.
Usage - GUI
The converter main.rb or selenium_convert.exe will launch after about 15 seconds (results may vary). This converter has the files necessary to create a portable Python installation with Selenium and PhantomJS.
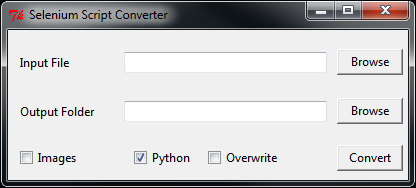
Browsing to a file will automatically choose a directory with the matching name to output to in out/. If the file is properly exported from Selenium, it will be converted into a wrapped script. There are several options which will augment the way the wrapper runs.
- Images (off) will enable loading images in the headless browser.
- Python (on) will copy the included python installation to the output directory.
- Overwrite (off) will overwrite the output directory without prompting.
After selecting your input Python file and (optionally) your output folder, hit convert.
Usage - CLI
Running main.rb with --help returns command line usage information:
Usage: main.rb [options] script.py
    -m, --[no-]images                Exported script should load images.
    -o, --[no-]overwrite             Overwrite any conflicting files on output.
    -c, --[no-]recopy                Recopy missing or different files.
    -p, --[no-]python                Include python in installation (Windows onl
y).
    -i, --script [SCRIPT]            Script to convert, UI isn't launched if thi
s is specified
    -h, --help                       Show this message.
Typical usage will always include the options -poi followed by a script. For example:
ruby main.rb -poi in/test_script.py
This will package Python into the folder out/test_script/ and drop the converted script in there as well.
Script Directives
There are directives which may be inserted into the source script’s function which will be parsed by the converter into wrapper functions. Variables can be used in their arguments as the converter turns the directives into functions after conversion.
- Available Directives:
- #log message - This will write to our child’s log message. This directly calls logMsg().
- #wait element kwargs
- This calls waitToDisappear() and takes any of the kwargs as the second argument. Please reference that function for further details about its arguments and other options. Examples:
- #wait overlay type=id - waits for the element with id=overlay to disappear.
- #wait overlay type=name, stayGone=3 - waits for the element with name=overlay to disappear and waits an additional 3 seconds for it to not reappear.
- #wait blurydiv timeout=5 - waits for id=blurydiv to disappear. If it does not after 5 seconds, returns.
- #wait blurydiv waitTimeout=5 - waits for id=blurydiv to disappear. Gives the element 5 seconds to appear first before waiting for it to disappear. Default time to appear is 1 second.
- #error message - Throws an error, which takes a screenshot, logs the screenshot name, and logs “message” to the log. Calls logMsg() with level=CRITICAL.
- #screenshot - Takes a screenshot which appears as error_#.png within the child’s log directory. The log references the file name when this is called. This is a direct call to screenshot().
Options Directives
Including an options block at the top (line 1) of your preconverted script will allow simpler option setting. The idea behind the options block is to make it easy to set defaults for a script which can then be passed out to several (possibly clueless) users. Those users then do not need to know what options to plug in, or what keys to manipulate to control the pool. These options will appear in initial settings, but even initial settings can be disabled. An example of a simple options block is provided.
#OPTIONS
#p option="text"
#import module
- Available options:
- Ghostdriver
- #p proxy="string" - Specifies a custom proxy server for Ghostdriver to route all PhantomJS traffic through. Default: “”
- #p proxy-type="type" - Specify the type of proxy. Possible options are socks5 and http. Default: “”
- #p images=True/False - Case sensitive for True or False. Specifies whether Ghostdriver loads images. Default: False
- #p browsercache=True/False - Case sensitive for True or False. Specifies whether to cache web content such as images on the disk (rather than in the RAM for a short period of time). Default: True
- #p ignoresslerrors="yes"/"no" - Specifies whether to ignore errors about an invalid or expired SSL certificate. Default: “yes”
- #p ghostdriverlog="filename" - Specifies the name of the log file for Ghostdriver. Default: “ghostdriver.log”
- Splunk Connection
- #p report="server FQDN or IP" - This parameter toggles reporting. If this parameter is left to the default (None) reporting will not happen. If other options are not properly set and this option is not blank, there may be spontaneous crashes when it fails to connect. Default: None
- #p report_port=8089 - The port to connect to the reporting Splunk server at. Default: 8089
- #p report_user="username"" - The username to authenticate with with Splunk, must be an admin or have permission to run remote commands. Default: None
- #p report_pass="password" - The password for the username used to connect to Splunk. Default: None
- #p report_index="testing" - The index to insert all data into within Splunk. Default: None
- Reporting Details (see also: Reporting Settings)
- #p id="auto" - Machine name used to report to the reporting server. If left at the default, it’s generated in the format user@hostname. Default: “auto”
- #p project="Project Name" - Project name, usually used in reporting to group together a bunch of common runs. Default: None
- #p run="Run Name" - Run name to send to the reporting server. This is another defining characteristic that is used in conjunction with script name to specify parts of a larger project. Default: None
- #p script="Script Name" - Script name which is used in reporting to distinguish different runs in a project.
- Selenium Configuration
- #p cache=True/False - Case sensitive for True or False. Specify whether found elements in PhantomJS should be cached. In pages with a great deal of AJAX this is recommended to save CPU resources searching for elements. There have not been any noticeable drawbacks to this option in extensive testing. Default: True
- #p childsleeptime=# - Amount of time in seconds waited in between searches for an element on a page. Low numbers increase CPU usage. 0 is equivalent to stock WebDriver. Default: 1
- #p lightconfirm=True/False - Case sensitive for True or False. If True, when checking if an element exists there will be no check for visibility or clickibility. This is practical for individual function usage in a script, globally False is the most acceptable option. If enabled globally, there will often be function calls to objects that “are not visible”. Default: False
- General
- #p level=-1-9 - Logging level, where -1 is all errors including debugging, 0 is all errors, and 1 is notices. See also: Logging. Default: 1
- #p logformat="DATESTR" - Custom folder names for the log folder. Default: “%Y-%m-%d_%H-%M-%S”
- #p jobs=# - Custom number of jobs to run initially. Default: 1
- #p children=# - Custom number of children to have initially. Default: 1
- #p stagger=True/False - Case sensitive for True/False. Determines if children spawnining will be staggered over time. Default: False
- #p staggertime=# - How far apart to stagger child launching in seconds. Default: 5
- #p initsettings=True/False - Case sensitive for True/False. If False, the initial settings wizard will be skipped. Error checking on provided parameters is skipped. Default: True
- #import module - Includes this import in the output (wrapped) script. This is useful for including, for example, random to randomly choose a user from a table.
- Ghostdriver